Sunday, April 26, 2020

Pumpkin and Vegetable Soup -- an amazing Hearty Vegetable Soup in the crockpot

It's spring! But the damp weather and chilly wind make a hearty vegetable soup a fabulous thing. Because of only going for groceries every couple of weeks right now due to the pandemic, we're keeping things like cabbage, celery, carrots, and sweet potatoes in the house because they last a long time. They are also fabulous for making soup.


I've got to tell you something about this soup: It's making my kitchen smell freaking amazing. And my kid keeps wandering over and peeking into the crockpot and telling me how good it looks. It's brothy, and chunky, and full of little morsels of delight.

I've got a crockpot  -- I've had one for years -- and it's  been a fixture in my soup making since the dawn of time.  This recipe is specifically design for the crockpot, and I layer in the ingredients in the order listed.

I usually use my crockpot on high for such dishes, and after about 4 hours, the food is pretty perfect. Like with any soup of this nature, however, the flavours also meld over night, and reheated leftovers the next day are aces.

You can also make this soup on the stove top, perhaps sautéing the onions before adding the other ingredients, and then simmering everything until nicely cooked and delicious.

Once the soup is finished, that's when I add the peas because they definitely don't need cooking. If you are serving right away, this can also be a great way to cool it down quickly for kids. Today I'm also going to add some soy noodles -- I've got some made from black soy beans, so the colour contrast will be fun.

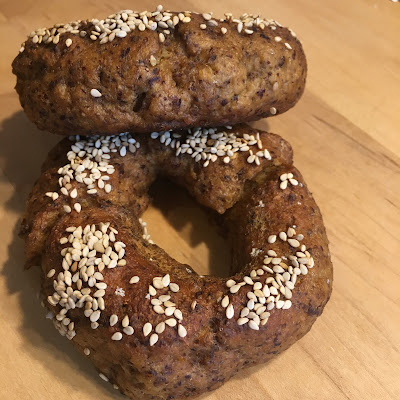
For fun, I'll be serving this will raw veggie sticks (cucumber, celery, and carrots), and freshly baked, gluten free bagels.


equipment needed:

crockpot
cutting board
knife
kettle (to heat water for soup -- optional -- this shortens the length of time it takes for the crockpot to reach cooking temperature
measuring spoons
measuring cups


ingredients:

A)

1/2 coconut butter
1 large onion (diced)
4 leaves nappa cabbage (diced)
4 leaves green cabbage (diced)
1 cup celery hearts (diced)
1 cup carrot (diced) (1 large)
1 cup cremini mushrooms (diced)
1 cup sweet potato (asian) (diced)

1/4  cup dried apricots (diced)

B)
1 cup soy curls
1 cup green edamame (no shell)

C)
4 tsp himalayan salt (+ or -)
1 tsp cumin
1 tbsp smoked paprika
1 tsp granulated garlic

D)
1 can pumpkin puree
1 tbsp apple cider vinegar
6 cups water (hot if possible)

E)
2 cups green peas, frozen (allowed to defrost), to be added when the heat is turned off on the crockpot

F)
soy bean noodles, cooked and set aside (add some to each bowl before serving)


directions:

1. in the order listed, turn on your crockpot to high, and layer your ingredients into your crockpot, in the order listed. Pour the hot water over everything once you've done the layering. This will help distribute the spices and seasonings.
2. reserve the green peas and cooked soy bean noodles
3. set the timer for 4 hours
4. after four hours, check and see if it's done. If it's not done, cook for longer. If it's done, turn it off, and add the peas.
5. serve (optional) with cooked soy bean noodles


Gluten Free Bagels -- plant based, whole foods, and delcious

I'm not going to participate in any New York vs Montreal Bagel debate, nor am I going to vouch for the authenticity of these bagels. However, in their defence, I will say this: 1) they taste great 2) they are boiled 3) they are gluten free 4) they are nutritionally powerful, and good for you.

I am neither from New York, nor from Montreal, although I have visited both places. I am a Toronto bagel-babe, through and through. In my misspent childhood, I used to go up to a bagel stores on Bathurst street at six on Sunday mornings with my also-an-early-bird father. I have a keen sense memory of the drive home on a cold winter morning, clutching an oversized, heavy-weight-brown-paper bag of hot-out-of-the-oven bagel goodness, inhaling the sweet and perfect aroma. To me, it's not about New York vs Montreal. It's about the bagels of my childhood. I have no idea which bakery we went to, nor do I know why we went all the way up Lawrence and Bathurst way for them. That being said, they were heaven.


Well, these are nothing like them. They are, however, delicious, spongey, puffy, chewy, full of flavour, and hit that spot inside each of us that is reserved specifically for bagels. And for people who need to avoid gluten for the sake of feeling well, they are pretty damn fabulous.

Today, after boiling, we pressed the tops of the bagels into a place of sesame seeds, and hit them with a wee sprinkle of salt for good measure. How bad can they be, really?


equipment needed:

mixing bowl
mixing spoon
measuring cups
measuring spoons
whisk
kettle or other way of heating water to approx 105 degrees
large pot for boiling bagels
baking sheets and silicone mat or parchment
cooling rack
slotted spoon
oven
scale (for portioning dough -- optional)


ingredients:

A)
2 cups warm water
6 tbsp coconut sugar
4 tsp yeast

B)
2 tbsp xanthan gum
2 tsp himalayan salt

C)
1 cup quinoa flakes
1 cup oat flour
1/2 cup sorghum flour
1 cup almond flour
1/2 cup cassava flour

D)
2 tbsp baking soda  (If you are a boil in malt or honey person, please don't let me stop you. You do you.)

directions:

1. combine the ingredients from A) and set aside. Make sure the water is not too hot. It should feel like a cozy bath temperature. Too hot will kill your yeast
2. combine the ingredients from B) and C) in a large mixing bowl. I like to use a whisk to make sure they are fully and utterly distributed
3. when you have seen your yeast activate, combine the wet and dry ingredients, and mix well.
4. I like to turn this dough out onto a floured mat, and form into a nice ball, add a little extra oat flour if needed.
5. divide into 12 equal portions (i used a scale for this -- 100 g each, but you can eye-ball it no problem)
6. let rise for about 1 or 1 1/2 hours
7. bring a big pot of water to a boil, adding couple of tbsp of baking soda (D)
8. cook the bagels 4 at a time (or however many can fit uncrowded into your pot) for 2 minutes per side
9. remove from the pot with a slotted spoon and allow to drain a little on a cooling rack
10. once cool enough to handle, pick them up carefully and top end them into a plate of sesame seeds (optional)
11. place on a baking sheet lined with parchment (and sprinkle with salt -- optional)
12. bake at 345 for 35 minutes or until they are done
13. remove from the baking sheet, and cool on a cooling rack


Sunday, April 19, 2020

Pain au Chocolat -- the gluten free, whole foods, plant based version

The intersection of bread and chocolate.

I live with two people for whom both bread and chocolate hold special and exalted places in their palates and in their diets. That is to say, neither of them ever gets tired of these goodies. I thought, why not combine the two? Especially right now, everyone is showing off their COVID bread, and here we are, all sad and gluten-free. I figured it was time to kick it up a notch. Enter, the pain au chocolat, or what we could call the best of both worlds.

I decided to take a fairly typical but soft gluten free bread dough, sweeten it a little extra with coconut sugar, roll it out flat, sprinkle it with goodies, cut it into long triangles, and roll them individually.

I wanted these buns to be more like bread than pastry, but next time I may enrich them with coconut milk, coconut butter, or some avocado oil just to see what happens. People who enjoy butter on their bread may enjoy more richness in their bread. Still, they were very well received, and make a satisfying Sunday morning nosh with a cup of tea.


roll your dough out into a nice big rectangle! I roll it out on a jumbo silicone mat, but I also use plenty of flour underneath and on top to keep it from sticking to the mat, and to keep the dough from sticking to the rolling pin


brush the rolled out dough with coconut nectar -- about 1/4 cup. No coconut nectar? No problem. What  do you have in the way of liquid sweeteners? Rice syrup?


sprinkled the dough 'evenly' with your mixture of date sugar, kinako, and salt


fair trade, organic chocolate. Only have chunks? no problem.


grab a big knife and chop your chunks up!


evenly distribute the chopped up chocolate over the whole surface


cut the dough using something that won't damage the surface you are working on!  Triangles please!!

roll the dough triangles starting at the wide end, and finishing at the narrow end, so the inside part is the widest part

put the rolls with the end face down on your silicone mat-lined tray. No silicone mat? No problem! You can use baking parchment. No parchment? Please use plenty of coconut oil and flour on that pan so your buns don't stick.

let 'em rise

rise for a couple hours, maybe


fresh out of the oven. Can you smell them? So good.


hello I'm a super cute chocolate roll. Won't you be tempted by me?


how about now???

mmmmm ....


full of chocolate goodness


equipment needed:

whisk
mixing spoon
measuring cups
measuring spoons
mixing bowls
kettle or other way to heat up water
oven
baking sheet
baking mat or parchment
dull edged tool for cutting dough into long triangles (like a pastry cutter or a plastic spatula)
large counter surface for rolling out dough
large silicone mat for rolling dough on (optional)
spoon for sprinkling ingredients
brush for brushing coconut nectar
timer
rolling pin


ingredients:

A)
1 1/2 cups warm water (or plant based milk for extra richness)
1/4 cup coconut sugar
1 tbsp yeast
1 tsp vanilla
(1/4 cup coconut butter -- optional)

B)
1 tsp himalayan salt
2 tsp xanthan gum
1/2 tsp tonka bean powder (optional)

(1/2 tsp baking soda, 1/2 tsp cream of tartar)

C)
1/2 cup coconut sugar
1 cup almond flour
1/2 cup chickpea flour
1/4 cup soy milk powder
1/2 cup cassava flour (or tapioca starch if you don't have cassava flour)
1/2 cup sorghum flour
1/2 cup oat flour

D)
1/4 cup coconut nectar (or other liquid sweetener of your choice)

E)
1/4 cup date sugar
1-3 tbsp kinako (roasted soybean powder) (optional)
1/16th - 1/8th tsp salt

F)
1 cup chocolate (I use fair-trade, organic dark chocolate chunks, and chop them into bits with a big knife). You can also use chocolate chips if you like!)


directions:

1) combine A, and set aside to proof
2) in a large bowl, combine B and C. I like to use a whisk (gently) to make sure these dry ingredients are all perfectly combine
3) once the yeast mixture has foamed, pour it into the bowl of dry ingredients, and mix well
4) once out your dough has successfully formed, turn it out onto a well floured surface (I use a large silicone mat on my kitchen counter, but that's not necessary)
5) roll out the dough (with enough flour to keep the rolling pin from sticking!) Try to make a nice big rectangular shape.
6) brush the dough with your coconut nectar
7) combine the ingredients from E and sprinkle all of it on the dough
8) chop your chocolate if necessary, and distribute evenly on the dough
9) cut the dough into long triangles. I got 9 (That was entirely random. If you cut rectangle in half half length wise, you  can make smaller roll ups -- approximately 20)
10) starting at the wide end of each triangle, roll the pieces of dough up (try to roll tightly, but handle them with care), and put them with the end face down on a lined baking sheet (I like silicone mats for lining my trays, but some people prefer parchment)
11) let them rise!
12) be patient
13) bake at 345 for around 40 minutes, depending on how big they are. (for little ones, bake for 30)
14) cool for at least 10 minutes before serving


ready to bake
baked for about 40 minutes


a cute pain au chocolat

imperfection is perfection


Thursday, April 16, 2020

Giant soft oatmeal and chocolate chip cookies -- cakies? whole foods, plant based, gluten free decadence

If muffin and cookie had a beautiful, perfect baby, it might be one of these decadent little numbers. Packed with whole-foods nutrition, these are an amazing anytime snack that will fuel you without guilt. But they are also big, soft, and puffy. Just right for making into an ice-cream sammy ... (or so my partner thinks. He's been slicing one in half like a bagel and filling it with our awesome sugar free blender ice cream. Yum.

These were originally conceived as a quick grab-and-go breakfast when my nibling was visiting, because they are a chocolate lover of the highest order. The breakfast version was less sweetened, using 1/2 the amount of coconut sugar called for in this recipe. If you are someone who, like them, enjoys chocolate for breakfast, this might be your jam, too.

My partner and child enjoy one as a late morning snack, or mid afternoon. I am surrounded by absolute chocolate fiends. (Which is why I had to make a double chocolate version, too)


equipment needed:

measuring cups
measuring spoons
mixing bowls
whisk
4 tablespoon scoop (optional) or soup spoon
fork and cup of water
baking sheets and silicone mats (or parchment)
oven
timer


ingredients:

a)
2 cups water
1/4 cup avocado oil (or 1/4 cup melted coconut oil)
1 tbsp molasses
1 tsp vanilla extract
1 tbsp apple cider vinegar

b)
1 cup coconut sugar (1/2 cup for less sweet cookies)
1/2 cup date sugar

c)
1 cup almond flour (or sunflower seed flower for a nut-free version)
1/2 cup tapioca powder
1/2 cup millet flour
1/2 cup oat flour
1/2 cup sorghum flour

d)
1/4 cup chickpea flour
1/4 cup soy milk powder

e)
1/2 tsp salt (earth salt, why not)
1 tsp xanthin gum
2 tsp ceylon cinnamon (or 1 tsp of another type of cinnamon)
1/2 tsp tonka bean powder (optional!)
1 tsp baking soda
1 tsp cream of tartar

f)
1 cup oat flakes

g)
1 or 2 cups of chocolate chunks


directions:

preheat oven to 345

1. In a medium sized bowl, combine the ingredients from a) and b), and whisk well
2. In a large bowl, combine the ingredients from c), d), e) and f), and whisk or stir until fully mixed
3. add the wet ingredients to the dry ingredients, and stir very very well, until completely incorporated
4. add in g)
5. using a 4 tbsp scoop, deposit equal lumps of the cookie dough onto the lined cookie sheets, aiming for about 12 per cookie sheet, until all the cookie dough is used up (I squeeze them all onto 2 baking sheets -- they won't spread at all)
6. using a fork dipped in water, (slightly) flatten and shape the cookie dough
7. bake at 345 for 25-30 minutes
8. allow to cool on the baking sheets, and then remove with a metal spatula


Double Chocolate soft cookies -- whole foods, plant based, gluten free deliciousness

For when oatmeal chocolate chip is not going to ring that bell, these double chocolate pieces of fabulousness may be just what you need.

These big, soft, puffy cookies are halfway between cake and cookie -- and they are chocolatey enough for even the most thorough-going of chocolate lovers. The best part is how good they are for you. All the decadence and satisfaction you could want, all while fuelling you well.

Cacao is a dark flavour, and my rule of thumb tends to be you need an addition of sweetener on a 1:1 ratio with however much cacao you put into something. Hence, since there is 3/4 cup cacao in these, there's an additional 3/4 cup date sugar on top of the coconut sugar in them. However, you are welcome to reduce that to whatever suits your own palate.

Finally, when it comes to grain flours, they are not all equal. However, these 'cakies' are super forgiving, and you can certainly sub in your favourite gluten free flours instead of millet. I love sorghum (super high in protein! tastes nice! delicate texture!) and oat flour, some people like brown rice flour or whatever. You do you. You may have to play around a little with quantities to make it work out perfectly, but what's a 1/4 cup rolled oats more or less between friends?


equipment needed:

measuring cups
measuring spoons
mixing bowls
whisk
4 tablespoon scoop (optional) or soup spoon
fork and cup of water
baking sheets and silicone mats (or parchment)
oven
timer


ingredients:

a)
2 cups water
1/4 cup avocado oil (or 1/4 cup melted coconut oil)
1 tbsp molasses
1 tsp vanilla extract
1 tbsp apple cider vinegar

b)
1 cup coconut sugar
3/4 cup date sugar

c)
1 cup almond flour (or sunflower seed flower for a nut-free version)
1/2 cup tapioca powder
1/4 cup millet flour
3/4 cup cacao powder

d)
1/2 cup chickpea flour
1/4 cup soy milk powder

e)
1/2 tsp salt (earth salt, why not)
1 tsp xanthan gum
1/2 tsp tonka bean powder (optional!)
1 tsp baking soda
1 tsp cream of tartar

f)
1 cup oat flakes

g)
1 or 2 cups of chocolate chunks


directions:

preheat oven to 345

1. In a medium sized bowl, combine the ingredients from a) and b), and whisk well
2. In a large bowl, combine the ingredients from c), d), e) and f), and whisk or stir until fully mixed
3. add the wet ingredients to the dry ingredients, and stir very very well, until completely incorporated
4. add in g)
5. using a 4 tbsp scoop, deposit equal lumps of the cookie dough onto the lined cookie sheets, aiming for about 12 per cookie sheet, until all the cookie dough is used up (I squeeze them all onto 2 baking sheets -- they won't spread at all)
6. using a fork dipped in water, (slightly) flatten and shape the cookie dough
7. bake at 345 for 25-30 minutes
8. allow to cool on the baking sheets, and then remove with a metal spatula

Wednesday, April 15, 2020

Black Bean Brownies

Black Bean Brownies 


Black bean brownies were all the rage a while ago. Admittedly, chocolate and black beans are a natural pairing, and desserts in Japan have long used beans, such as the fabulous daifuku mochi, which we've been making a tonne of lately (but that's a recipe for another day). 

I am nuts about beans (and nuts) because they are a very slow carb. They provide a starchiness to baked goods, but digest slowly, and prevent blood sugar spikes. Because I use black bean flour instead of canned beans, these avoid the gluey texture that some black bean brownies can fall victim to. 

For extra decadence, why not throw a handful of dark, fair-trade chocolate chunks into the batter, and sprinkle some coconut sugar on top to form a gorgeous crust. 


equipment needed:

mixing bowl
mixing spoon
measuring cups
measuring spoons
square baking dish (I used silicone but glass is good too -- just make sure you grease it well with coconut oil and maybe line the bottom with parchment)
a grinder for the chia seeds if you buy whole and grind them yourself (or buy ground chia)
oven (obvi)


ingredients:

a)

2 cups water
1/2 cup avocado oil (or melted coconut oil)
1 1/4 cup coconut sugar
1/2 cup date sugar
1 tbsp apple cider vinegar
1 tsp vanilla extract


b)
1 cup black bean flour
1/2 cup cacao
1/2 cup soy milk powder
1/4 cup tapioca starch

c)
1 tsp baking soda
1 tsp cream of tartar
1/2 tsp sea salt
1/2 tsp tonka bean powder
1 tsp xanthan gum (stabilizer)
1 tbsp ground coffee beans


d)
1 1/2 cup chocolate chips -- fair trade, please (optional)

e)
extra chocolate chunks to put on top
or you can sprinkle coconut sugar on top (optional)


directions:

preheat oven to 345 and prepare your baking pan!!

1. combine the ingredients from a) in a bowl, and whisk
2. in a large mixing bowl, combine all the ingredients from parts  b)  and c). You may like to sift this!
3.  combine all of the above into the large mixing bowl, and mix well -- I used a whisk for this!
5. once the ingredients from a) b) and c) have been righteously integrated, stir in your chocolate chips (part d)
6. pour the batter into the baking pan, and make sure it's smooth and even
or 
7. scoop the batter by 2 tbsp scoop into small muffin cups
7. sprinkle the top of the batter with  the coconut sugar OR chocolate chunks from part e)
8. bake at 345 for 40-45 minutes
9. Cool and then enjoy the NEXT DAY

seriously.


Chocolate Blender Ice Cream -- plant based and sugar free

I want to swear when I think how delicious this ice cream is. I make it without sugar (xylitol and erythritol) because sugar gives me migraines, but you can make it with can sugar, too, if you prefer. This cuss-worthy and delicious, rich and decadent, and thoroughly satisfying even with a small scoop. I love it so much, I want to share it with you.


Xylitol is kind of magic in ice cream, though, because it prevents things from freezing solid. It contributes to a pretty glorious ice cream texture. We've made this sort of ice cream using vanilla with molten chocolate drizzled in at the last minute for a very credible stracciatella. Anyway, don't be afraid to customize if that's your jam. If you like chocolate however, give this one a try. Yummy!

I got a stupid fancy fake blender (fancy blender knock-off) and it does that high speed combining thing. But a hand blender would work too.

For those of you who love plant-based ice cream not wisely but too well, here's a delicious option that may make your ice-cream dreams come true.


equipment needed:

blender or immersion blender
ice cream maker
measuring cups
measuring spoons
covered container to chill ice cream mixture in fridge prior to using ice cream maker
refrigerator
freezer safe container


ingredients:


A)
3 cups water
3 tbsp coconut oil
1 or 2 tsp vanilla extract

B)
3/4 tsp guar gum
1/8 tsp xanthan gum

C)
1 cup xylitol
3 or 4 tbsp erythritol

D)
9 tbsp cacao or cocoa (I've been having fun with the dutch process cocoa lately -- the darker the better!)
3/4 cup soy milk powder
5/8 tsp sea salt


directions:

1. in the jar of your blender, add the ingredients from A) and blend
2. add B) and blend
3. Add C) and blend
4. Add D) and blend
5. pour into a container and chill in the refrigerator
6. when cold, put into ice cream maker and freeze until creamy, and frozen, as per manufacturers directions


Alt Bread -- gluten free, nutrient dense, and plant-based

This bread is no crusty sourdough, and won't win awards for it's charred crust and insta-worthy bragging rights. However, for the gluten-free peeps among us, it's a perfectly serviceable loaf that toasts like a dream, is super nutritious, and tastes damn good.


A)

2 cups warm water
6 tbsp coconut sugar
1 1/3 tbsp (4 tsp) bread yeast


B)

2 tsp himalayan salt
2 1/2 tsp xanthan gum

1/2 cup tapioca starch
3/4 cup chickpea flour
1 cup almond flour
1 cup sorghum flour (or 1 cup buckwheat flour)
1 cup quinoa flakes (or 1 cup oat flakes)


1. combine a and set aside
2. combine b and stir well
3. add a to b and mix well
4 put onto a piece of parchment and shape, place parchment into baking pan (loaf pan or whatever you like. Sometimes we use a round pan!)
5. allow to rise for 2 hours
6. bake at 345 for 1 hour