Showing posts with label gluten-free. Show all posts

Saturday, July 11, 2020

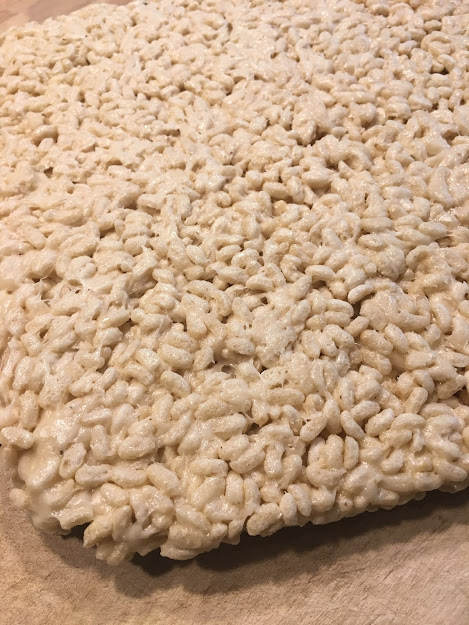
Marshmallow and Crispy Rice treats -- the plant-based version


Howdy treat-lovers. There's no way to to make marshmallows and crispy rice  squares anything other than pretty much decadent and nostalgic. They are a treat, and there is no way around that. But at the same time, it's possible to use ingredients that do not support companies who oppress other humans. That's a fancy way of saying, buying processed ingredients like marshmallows and crispy rice cereal is an opportunity to say 'no thanks' to the practices of Big Food. We chose Dandies marshmallows, which is a product from Chicago Vegan Foods -- a small, family owned company. Nature's Path, who makes our crispy rice cereal of choice, is also a family owned company. Yes, these ingredients cost more than their Kraft or Kelloggs counterparts, and if you are someone who prefers to use more conventional ingredients, you do you with no judgment from me. 


warning: These treats have a great flavour and a great nostalgia factor!!


equipment needed:

1 large pot 
silicone scraper or large spoon for stirring
measuring spoons
measuring cups
square silicone pan, or glass pan lined with parchment


ingredients:

A)
1 263 g package of dandies vegan marshmallows (mini melts the most quickly, but full size is fine too, just be patient)

1 tsp vanilla extract

3/8 tsp himalayan salt

pinch tonka bean powder (optional)

4-6 tbsp coconut oil


B)
4 cups crispy rice cereal (we use brown rice cereal made by Nature's Path)


directions:

1. in a large pot, melt the marshmallows on low heat. When the marshmallows are melted into a soft cream, you can remove from heat and add the other ingredients, stirring well to fully incorporate. Note for the faint of heart -- vegan marshmallows are a little more effort to stir and incorporate than traditional marshmallows, so be prepared for a little more effort than you might expect.
2. once the marshmallow cream is smooth and homogeneous, stir in the crispy rice cereal.
3. scoop the mixture into a square silicone pan or a lined glass pan, and flatten. (you can flatten it with hands coated in coconut oil, or by putting a silicone mat or piece of parchment on top and pressing down firmly but gently.
3. cool on the counter. When fully cool, cut into pieces. You can remove it from the pan first, and cut it on a cutting board.

store in an airtight container. 


Sunday, July 5, 2020

Apple Cake Cookies -- big, soft, gluten-free and plant-based cookies


Ever wonder what happens when you take a muffin or cake batter, and bake it as a big soft cookie? The thing you need to understand is that gluten-free muffin or cake batter is much thicker and stiffer than its non-gluten-free cousin, so this works perfectly in the gluten-free world. In the non-gluten-free world, you might end up with a sloppy mess on your hands. 

We're big into the cake-cookies these days. For one thing, they are a perfect way to portion cake so that you don't eat too big a piece. (I'm looking at you, 12 year old) For another thing, they make cookies that are soft enough for ice-cream sandwiches. For yet one more thing, my partner loves soft cookies. So: win-win-win. 

We've been rocking the oatmeal and chocolate chip cake cookies, the double chocolate cake cookies, the banana and chocolate chip cake cookies, and today, the apple cake cookie. Think double chocolate cake cookies with a decadent layer of rich chocolate blender ice cream inside, or gorgeous banana chocolate chip cake cookies sandwiching some  incredibly creamy vanilla blender ice cream. 

I've packed as much flavour as possible into these little delights -- and for anyone who knows me and my flavour layering obsession, that is a fair-bit. I have apple flour in this recipe, because I had an opportunity to try some and I thought it would be fun. If you don't have any, don't worry. You can simply add in an extra 1/4 cup of oat flakes instead, or an extra 1/4 cup of date powder if you're feeling wild.


equipment needed:

oven
kettle
baking sheets
silicone baking mats or baking parchment
spatula
mixing bowls
mixing spoon
whisk
measuring cups
measuring spoons
knife
cutting board
cup of water
fork
4 tbsp scoop


ingredients:

A)
2 cups water (warmed in kettle to melt coconut oil)
1/2 cup coconut oil (alt you can use 1/2 cup avocado oil)
1 tbsp molasses
1 tbsp apple cider vinegar
1 tsp vanilla extract
5 drops lemon essential oil (or you can sub in lemon flavouring if you like. Lemon juice isn't the same)

B)
2 tbsp date powder (aka date sugar, literally dehydrated and powdered dates)
1 cup coconut sugar (aka coconut palm sugar)

C)
1 tsp xanthan gum
1 tsp baking soda
1 tsp cream of tartar
1 tsp ceylon cinnamon (yes there is a difference, bu you can simply throw in 2 tsp of what you've got)
1 tsp saigon cinnamon
1 tsp ginger powder
1/2 tsp tonka bean powder (tonka what?? don't worry -- totally optional!!)
1/2 tsp himalayan salt


D)
1 cup almond flour
1/4 cup apple flour
1/4 cup tapioca starch
1/4 cup chickpea flour
1/4 cup soy milk powder 

E)
1/2 cup sorghum flour
1/2 cup millet flour
1/2 cup oat flakes

F)
2 apples, cored and diced (I left the skin on, but you do you) (I used gala -- choose your fav baking apple!)


directions:

1. preheat the oven to 345
2. in a bowl, combine the ingredients from A and set aside
3. in a large bowl, combine the ingredients from B, C, D, and E. I use a whisk to make sure the distribution is as good as possible.
4. prepare your apples! wash, core, dice. make sure the pieces are not too big! 1 cm cube or less.
5. pour your mixture from A into the large bowl of dry ingredients, and stir well, scraping down the sides until it is perfectly combined.
6. when the batter is mixed, add in the diced apple, and stir until fully incorporated.
7. using a 4 tbsp scoop, place the batter on a baking sheet, adequately spacing the balls that you can flatten them a little. I use baking sheets lined with silicone mats, and place 12 per baking sheet. (makes about 27 (or you can just add a wee bit extra onto each one, and make 24)
8. One the batter has been scooped, flatten the cookies a little using a fork dipped in water.
9. bake at 345 for 35-40 minutes, or until they spring back nicely
10. cool on the baking sheets for a little while
11. remove from the baking sheets using a metal spatula, and fully cool on a cooling rack.
12. store in an airtight container in the fridge


Saturday, January 18, 2020

Breakfast Cookies -- a customizable, grabble, gluten-free, plant-based quick-meal

I don't personally think breakfast is the most important meal of the day. However, I've never been a breakfast person, so there you have my implicit bias. My kid used to love breakfast, and often also second breakfast. He was all about that first meal of the day. Even just the thought of breakfast used to make him happy. These days, I think he's gearing up to be a teenager because he's become much less interested in eating in the morning, and often will just have a small scoop of peanut butter and call it done. Eating is one of those things that's both highly personal, but also shared by everyone, so it's hard not to be affected by other people's opinions about what one should do. As my old voice teacher said "You do you. I'll be over there in the corner sweeping." I've always liked to let my kid direct his own eating as much as possible, schedules not withstanding, because I had always taught him to listen to his body, and take care of it based on what it told him he needed. For some people, breakfast happens when you wake up. For others, the first meal of the day is noon or later.  But I do think, regardless of what time of day you eat any meal, sometimes it needs to be really really fast, or really really easy to take with you.

I wanted to make a breakfast food that was portable, compact, nut-free, and nutrient dense. Oh -- and, of course, delicious. That, along with nutritious, is the other non-negotiable. I am forecasting broad appeal for these breakfast cookies. A combination of gluten-free oat bran and sunflower seed flour provides a wholesome base, and then plenty of tasty mix-ins to jazz it up. The mix-ins are customizable, so you can use whatever suits your fancy.

I say breakfast, but these are a great trail snack for hiking, post workout-refuel, or anytime you need to stoke your engines with nutrient dense, wholesome goodness.

They are sweetened with a little coconut nectar, which is from the flowers of the coconut palm. Coconut nectar is very low on the glycemic index, high in minerals, and has a pleasant fruity sweetness that is neither cloying nor overpowering. There is also just a bit of date sugar in them -- literally ground up dates -- which is also full of minerals, and also fibre. The balance of fats and proteins in these cookies mean that even with a little bit of sweetness, they won't spike your blood sugar, and will definitely satisfy your need for fuel, as well as your hunger for something very tasty.


equipment needed:

measuring spoons
measuring cups
mixing bowls 
mixing spoons
whisk
kettle (for heating water)
2 cookie baking sheets
2 silicone baking mats or baking parchment
oven
pan for toasting coconut and pumpkin seeds on the stove top
4 tbsp cookie dough scoop
rubber/silicone scraper
oven mitts
fork
cup of water
2 cooling racks
metal spatula

ingredients needed:

A)
1/2 cup hot water
1/2 cup coconut butter (or any nut butter if you don't need these to be nut free!! I've used almond butter for these and they were very successful)
1/2 cup coconut nectar 
1 tbsp apple cider vinegar
2 tbsp molasses
1 tsp vanilla extract

B)
1/4 cup date sugar
1 1/2 cups oat bran
1 1/2 cups raw sunflower seeds ground into flour (I ground my raw sunflower seeds in a coffee grinder until they were a fine powder) (You can substitute almond flour if you don't need these to be nut free!)
1/2 tsp cinnamon
1/2 tsp himalayan salt
1 tsp baking soda
1 tsp cream of tartar
1/2 tsp ground tonka bean (optional)

C)
mix-ins 
2/3 cup desiccated coconut, toasted in a pan on the stove top until nicely light brown
2/3 cup raw pumpkin seeds, toasted in a pan on the stove top
1/3 cup dried cranberries (I use the apple-juice sweetened ones)
1/3 cup seedless raisins
2/3 cup hemp hearts
1 cup fair-trade dark chocolate chips/chunks

... or whatever you like!


directions:

1. preheat the oven to 345
2. line your 2 baking sheets with parchment or silicone. I love silicone mats, and use them almost exclusively. They last forever.
3. In a mixing bowl, combine all the ingredients from A, and set aside
4. In another mixing bowl, combine all the ingredients from B, and mix very well
5. using a whisk, stir the contents first mixing bowl until completely mixed
6. add the ingredients from the second bowl into the first bowl, and mix very well with a spoon
7. once the 2 bowls have been successfully combined, add the mix-ins and stir well
8. scoop the cookie dough using the 4 tbsp scoop, placing 12 scoops per baking sheet, at regular intervals (usually 3x4). You should have 2 sheets of 12 each.
9. using a fork dipped in a cup of water, flatten the cookies into a pleasing thickness and nice round shape
10. bake at 345 for 24 minutes. Swap the top and bottom tray positions with each other half way through, at the 12 minute mark.
11. remove the cookie sheets from the oven, and allow the cookies to cool on the pan for a while
12. When they are cool, you can remove the cookies from the baking sheets using a metal spatula

store in an airtight container
share with friends
enjoy


Thursday, May 9, 2019

Oat Cakies -- if cookie and muffin had an oatmeal love child -- soft, gluten-free, and plant-based

I have an Almond Cow plant-based milk maker, thanks to their epic and very generous black Friday sale. I love this AC. I use it regularly. My favourite thick creamy milk that I make for my tea and coffee is a combination of coconut, hemp hearts, and pumpkin seeds or sunflower seeds. It's very rich, very very creamy, and very very very wonderful. I turn the left over pulp into completely addicting spicy crackers with the addition of ground chia seeds, coconut flour, and liberal quantities of seasoning.

My kiddo adores chocolate oat milk. It's smooth,  creamy, and delicious. I have turned the leftover oat slurry pulp into soft oat cakies that are quick and easy to make.

They are not very sweet, because I was aiming for pleasant, not overly complicated, and simple tasting. The sort of thing you want when you are in the mood for something plain to go with a cup of tea.

oat cakie

delicious cranberry oat cake


When making oat milk, I use 1 cup of rolled oats, which I then process in the Almond Cow. The resulting pulp is 1 cup of oat slurry, which I then used as a base for this recipe. I have recreated making a slurry using 1/2 cup of oats and 1 cup of water, and it worked perfectly.

equipment needed:

blender (hand blender or jar blender)
measuring spoons
measuring cups
mixing bowl
mixing spoon
whisk
silicone baking mats or parchment paper
baking trays
oven
4 tbsp/2 oz scoop -- optional -- you can also scoop using a spoon. (I like the ease and the uniformity of using a scoop)


ingredients:

A)
1/2 cup quick cook oats
1 cup water
1/4 tsp xanthan gum

B)
1/4 tsp mountain salt
1 tsp vanilla
1 tbsp apple cider vinegar
1/2 cup date sugar

C)
1 cup date shredded coconut 
1 cup large rolled oats flakes
1/2 tsp baking soda
1/2 tsp cream of tartar

D)
mix-ins -- why not choose one (or two)?
1/2 cup chocolate chips/chocolate chunks
1/2 cup dried cranberries
1/2 cup raisins
 ...
whatever you like


directions:

1. preheat the oven to 345
2. blend the ingredients from part A) to make a slurry
3. in a mixing bowl, whisk together all the ingredient from part A) and B)
3. add in the ingredients from part C), and mix well. The batter should be thick enough to hold its form. If it's too runny, add more oats
4. if you are using mix-ins, you can add them now!!
5. scoop about 4 tbsp of batter per piece onto a silicone lined baking tray (or parchment paper lined baking tray)]
 I did 6 per tray, and this recipe made 10 total. If you add in 1/2 cup of mix-ins, it will make 12 pieces. )You can also scoop using a 1 oz or 2 tbsp scoop for small little cakies but you'll have to decrease the baking time. This will make twice as many.)
6. bake for 35-40 minutes at 345, or until browning nicely around the edges, and hold their shape well but are not too hard.
7. remove from the oven and cool
8. store in an airtight container in the fridge


baker's notes:
-This recipe will make 10 unless you use mix-ins, in which case it will make 11 or 12, depending on how much you add
-You can add in whatever you like that will go with oatmeal. Next time I think I will add some hemp-hearts, or maybe sunflower seeds and apple chunks
-if you are adding raisins and you want to spice things up, why not put in 1 tsp cinnamon and 1/2 tsp ginger?
-Date sugar is literally dehydrated and then powdered dates, so it is high in fibre and all kinds of minerals and micro-nutrients as well as being sweet. A pretty fabulous sweetener.

cranberry oat cake


after baking

before baking


Wednesday, May 8, 2019

Choose Your Adventure Cake -- plant-based, gluten-free, moist, delicious, and reliable

A recipe by request!

How about an all purpose cake that you can easily tweak to suit your needs? I'm talking about a cake with such a delicate and lovely texture that you could dress it up in frosting and sing happy birthday, or throw in some oats and mix-ins and say "hello muffin" in the same adoring tone you greet your offspring when they wake up in the morning. I'm talking about a chameleon that can go from chocolate to vanilla, from plain to spice, from comforting to exciting with just a few simple steps and clearly delineated choices. Does this sound too good to be true? Oh, and did I mention it's entirely plant-based, gluten free, and uber delicious?

IT'S NOT TOO GOOD TO BE TRUE!

IT IS SIMPLE!!

YOU CAN DO IT!!!!

introducing: Choose Your Adventure Cake -- a recipe by request


equipment needed:
2 mixing bowls
measuring cups
measuring spoons
mixing spoons
whisk
muffin trays and papers or silicone muffin cups and baking sheets
kettle 
oven


ingredients:

A)
1 cup warm water
1/4 cup coconut oil 

or 

1 cup cool water
1/4 cup avocado oil


B)
1 tbsp molasses or honey or coconut nectar or maple syrup
1 tsp vanilla
1 tbsp apple cider vinegar

C)
1/2 cup coconut sugar — more wholesome — great for everyday treat

or

1/2 cup organic cane sugar — will be more like ‘cake’

D)
1/4 tsp mountain salt
1/2 tsp xanthan gum 
1/2 tsp baking soda
1/2 tsp cream of tartar
2 tbsp tapioca flour
2 tbsp chickpea flour (or white bean flour)
1 tbsp soy milk powder

E) 
(choose 2 from below totalling 10 tbsp):
5 tbsp millet flour or 5 tbsp brown rice flour
5 tbsp sweet brown rice flour
5 tbsp sorghum flour or 5 tbsp oat flour


F)
1) for vanilla, add: 
4 extra tbsp flour (choose from above options in E)
2 tbsp coconut sugar or organic cane sugar
1/4 tsp tonka bean powder

2) for chocolate, add:
4 tbsp cacao
4 tbsp coconut sugar or organic cane sugar (you'll probably want cane sugar for this to be honest)
2 coffee beans finely ground
optional ‘mix-in’ 1/2 cup chocolate chip for double chocolate

3) for muffins, add:
1/2 cup large oat flakes
1 tsp cinnamon/ginger/clove/allspice etc
‘mix-in’ —1/2 cup raisins/sunflower seeds/ blueberries/diced apple etc


directions:

1. preheat the oven to 345
2. in the 1st mixing bowl, combine the ingredients from A, B, and C, ensuring that the coconut oil is melted and the sugar is dissolved
3. in 2nd mixing bowl, combine the ingredients from D, E, F, (save for any mix-ins — they always go in after everything has been combined right before scooping the batter) Make sure this is completely mixed
4. combine the contents of both mixing bowls (adding dry to wet is best) and whisk well
5. stir in any ‘mix-ins’ if applicable.
6.
a) for muffins or cupcakes: scoop into paper lined muffin trays or silicon muffin cups on baking sheets (for the later, don’t crowd  — spread them out on the tray) (I love using a 4tbsp scoop for this) (makes about 10 little cakes or muffins depending on how many mix ins)
b) for little round pans for layer cake: line each round with parchment and also brush with coconut oil — trust me (this will make about 2 little round layers — or double it to make 3 8 inch layers)
7. bake for 40 to 55 minutes at 345 depending on size of cake -- cupcakes and muffins will take less time than a bigger cake!!  Bake until the cake feels springy and firm, but still delicate to the touch. Trust your finger tips!! You can also poke it with a toothpick to see if it's done.
8. remove from the oven and cool


bakers notes:

-Don’t be afraid to get creative!
-If you throw in frozen blueberries or chocolate chips, don’t do it when the batter is warm (better use cool water and avocado oil)
-You can sub in other gluten free grain flours that you like — just keep in mind that this will sometimes alter the quantity of water you need (for example, buckwheat flour tends to be more absorbent, so you might need 1 tbsp or 2 less)
-Trust your finger tips — you will get good at judging when the cake is springy and firm, yet still delicateThis cake is delicate enough to work well as a real cake, especially if make with cane sugar for that extra decadent taste. However, if you go the coconut sugar route, you can also mix in whatever you like for a hearty muffin.
-Sprinkling some coconut sugar or cane sugar on top before baking can make the muffins or cake look a little fancier than they would otherwise, if you are going with an unfrosted look


alternate ideas:

pumpkin:
**Instead of using 1 cup of water and 1/4 cup of oil, use 1/4 cup of pumpkin puree, 3/4 cup water +2 tbsp, and throw in your favourite autumnal spices like cinnamon, ginger, allspice, nutmeg, and cloves. 

apple and raisin:
**Instead of using 1 cup of water and 1/4 cup of oil, use 1 cup of apple sauce, 1/4 cup of water, and 1/4 cup of oil -- great with raisins, walnuts, and cinnamon

banana and chocolate:
**Instead of 1 cup water and 1/4 cup oil, try 1 cup of pureed, over-ripe banana, 1/4 cup water, and 1/4 cup oil. This will be great with chocolate chips! You may want to reduce the amount of sugar you add by half, depending on how sweet the bananas are


Tuesday, May 7, 2019

Requests are welcome -- plant-based, whole-foods, and gluten-free

Hello anyone who is reading this. I welcome requests. I can design a recipe to suit your specifications. Last week someone asked me for a sort of all purpose cake recipe that they could tweak to change from vanilla to chocolate, from cake to muffin, from plain to spice with very straight forward substitutions. I call it the Choose Your Adventure Cake. And it's fantastic. I made it marbled and swirled with both chocolate and vanilla batter on the weekend, and really it's pretty darn awesome. I will share this recipe soon! But in the mean time, hit me with all your gluten-free, whole-foods, plant-based recipe requests. I'd love to develop something special to your specifications.

Choose your adventure cake -- chocolate and vanilla!


The Gluten-Free Toast Loaf

It may not be adequately scientific, but migraines drove me to eliminate gluten, following my own research down the rabbit hole of chronic pain etc.

This journey into the bunny warren of bread-alternatives has definitely engendered more than its share of experiments. The main challenges were coming up with a cohesive symbiosis of ingredients that are soft enough to allow the loaf to rise, but aren't too wet inside once the baking is finished. I know there are an exhausting number of books out there in the Toronto Public Library on how to make bread without gluten, but here experimentation is the name of the game, the journey being just as important as the destination. Although the toast eaters in this home might declare the quality of the toast to be the pinnacle of their concern.

This option is very popular in our household right now, especially cut a little bit thick, and toasted with determination and thoroughness.

It's tricky to make bread that does that bread thing without gluten in it. However, there are some secret ingredients that help the cause. One of them is xanthan gum, one of them is starch like tapioca, and one of them is a bean flour like white bean flour or chickpea flour. In addition to that, some grain flour, rolled oats, etc. Tapioca starch adds wonderful springiness and sponginess, and also functions as a powerful prebiotic, nourishing your optimal intestinal flora as well as you. The combination of ingredients that I am sharing with you here is by no means the only option, but we've been quite happy with the texture and taste of this little toast loaf.


equipment needed:

loaf pan lined with parchment paper
kettle
measuring cups
measuring spoons
mixing bowls
mixing spoons
oven 

(personal hack: I use a small roaster oven -- the kind other people use for thanksgiving -- to rise and cook my bread loaves, especially when it's hot outside and I don't want to run the oven. You can often pick them up for dead cheap on kijiji)


ingredients:

A)
1 1/2 cups warm water (comfortable bath warm)
1/4 cup coconut sugar
1 tbsp bread yeast

B)
2 tsp xanthan gum
1 heaping tsp mountain salt
1/2 cup white bean flour (or chickpea flour)
1 cup sorghum flour (you can opt for other flours like millet or buckwheat, but may need a little less buckwheat as it absorbs more water)
1 cup quick oat flakes
3/4 cup tapioca starch


directions:

1. combine A), stir well, and set aside
2. in a separate mixing bowl, add all ingredients from B) and mix very very well until completely combined.
3. when A) has foamed up, add it to B), and mix well.
4. the dough should be sticky, but hold its form.
5. scoop it into a lined loaf pan, and smooth the surface with wet hands or a wet silicone scraper.
6. allow to rise. I do this in the oven with the light on, or in my little roaster oven, or on the counter in the sun
7. after it has risen for 3 hours, bake at 375 for 1 hour
8. when finished, remove from pan, and let cool on a cooling rack
9. store in an airtight wrap (we keep it in the fridge, but you do you)

Monday, May 6, 2019

Cacao and Date Balls

cacao and date balls, rolled in finely shredded dried coconut for a non-sticky taste sensation


I love the idea of combining whole foods to make a delicious taste sensation. We get the nutrition we need, with a taste that can't be beat. I've gone through many evolutions with this recipe and others like it to create a cacao ball that we enduringly enjoy, and this has remained our stead-fast go to for quite a while now.

These little darlings are each a supernova of nutritional intensity. Cacao is a sublime source of many micro nutrients and minerals, as well as fibre and deliciousness. Cacao butter gives you fat that is both fuel, and incredibly beautifying. Oh, and did I mention delicious? Cacao butter and vanilla together? Hello, beautiful. Coconut is one of nature's most perfect foods -- and such an amazing source of energy fuel. Chias, of course, need no introduction, for their reputation for gut healing and health protecting precedes them. The gorgeous proteins and high octane fats in our humble little hemp hearts will make both your body and your brain happy. Even dates, which are so incredibly sweet, and little powerhouses of micronutrients, minerals, and fibre. Even mountain salt brings minerals to the table, as well as elevating what would otherwise be bland into a state of high harmonic resonance and fabulousness.

My words to you: don't fear the fat, and when you eat sugar (like these dates) make sure they are with great sources of fat and protein to keep your blood sugar stable and keep your body happy and your energy sustained.

equipment needed:

food processor
coffee or seed grinder for chia seeds
measuring cups
measuring spoons
bowl for tossing the balls in coconut 
silicone mat for rolling out balls on (not necessary, but I find it helpful -- you can also lay out a sheet of parchment


ingredients:

A)
1/4 cup ground chia seeds
1/4 cup hemp hearts
1 cup shredded coconut, packed and heaping
1/2 cup raw cacao powder
3/8 tsp mountain salt


B)
1/4 cup raw cacao butter
1 tsp vanilla extract

C)
60 to 70 pitted date, check each one to make sure there are no pits (pitted dates that are perfect for this)
D)
finely Shredded coconut (or desiccated coconut)


Directions:

1. Put the ingredients from part A) into a food processor, and run until finely ground
2. Add in the raw cacao butter and vanilla and pulse until combined -- don't run too long
3. With the processor running, add dates through the spout (check for pits before adding). Add enough dates that a sort of ‘dough’ forms, and it no longer looks sandy or crumbly Depending on how soft and how big your dates are, it could be 30 or it could be 60. I think my dates are quite small. This is half a bag of them.
4. Remove the dough from the food processor, and roll into bite sized balls
5. Roll each ball in shredded coconut. I like to place some of the coconut in a bowl, add a few of the rolled balls, and then toss the bowl to get the balls coated in coconut.
6. Store the cacao date balls in the fridge in an airtight container. They will keep in this manner for weeks, unless they are eaten first.


Welcome to the Test Kitchen

Welcome to my Test Kitchen. My plant-based, gluten-free Test Kitchen. This is where I come up with some wild and fabulous idea, and then make it a reality. Or some pretty boring idea, and make it a reality.

Like on Pie Day/Pi Day, we decided spur of the moment to create some naughty little custard tarts, and then had the fun challenge of coming up with a gluten-free crust and a plant-based custard that would be JUST WHAT WE NEEDED, in all the gloriously nerdy sense of the word.

And sometimes I am simply in search of something wholesome to stuff into my kid's lunchbox that doesn't have nuts, won't spike his blood sugar, and absolutely will be yummy. Lunchbox Cookies to the rescue.

Sometimes my ideas launch efforts that succeed tremendously. Those will be the ones I share here. Sometimes my efforts are dismal failures. I may not choose to share those.

My reason for doing this is I have always created recipes to fill a need I have, instead of seeking out someone else's recipe. Why? I don't know. Possibly stubbornness. Possibly imaginative creativity. Possibly I don't follow recipes well. I also hate reading manuals. For me, creating recipes is among my favourite things to do. When a recipe I develop is a wild success, it is so satisfying. And when they are too good to keep to myself, I love giving other people the joy of my creations, so I thought I'd share them here, in case the recipes can fill a niche need for someone else too. If you try them, let me know what you think. If you share them, please let people know I invented them.

Thank you so much for reading and checking out my quirky Test Kitchen. I'm really glad you are here.